Group advising appointments are for those advising areas that utilize large group advising sessions, such as First Year Advising. These types of appointments are uniquely different from individual appointments in that these types of sessions will not populate onto the Student Success Timeline for individual students. Instead, group advising sessions will appear in a static widget on each student account, but the details of the group advising session can only be viewed in the Appointments section of the CRM (advisors) or the Group Advising tab in MyMadison Connect (students).
Creating a Group Appointment
- In the Navigation Dropdown menu, select Appointments.
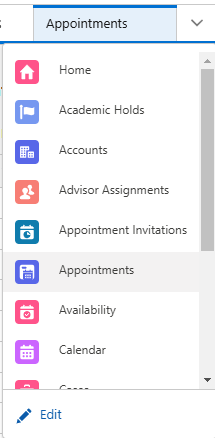
- In the top-right of the screen, click Create Group Appointment.

- The Schedule Group Service Appointment screen will appear.
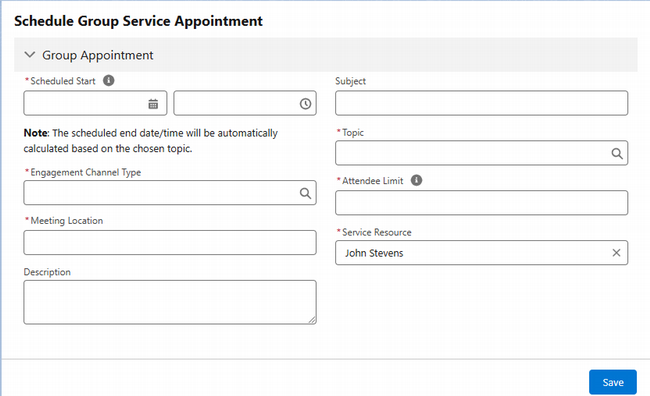
- Choose the date and time for the group appointment in the Scheduled Start region.
- In the Engagement Channel Type field, select whether this group appointment is In Person or Virtual.
- In the Meeting Location field, type the physical location of the appointment for an in-person appointment or paste a Zoom link for a virtual appointment.
- Note: group appointments do not automatically assign physical locations or Zoom links from your Service Resource information like individual appointments do.
- Type a Description for the group appointment, if desired.
- Type a Subject for your group appointment.
- Choose a Topic (length) for your group appointment.
- You may choose between Group Appointments with lengths of 30, 45, 60, or 90 minutes.
- The New First Year and New Transfer Group Advising Appointments are reserved for First Year Advising only, and they are both 75 minutes in length.
- Type the maximum number of students permitted for this group appointment in the Attendee Limit field.
- A group advising appointment cannot exceed 50 students. If necessary, you may create multiple group appointments to run concurrently if you want more than 50 attendees for any advising session.
- Once a group appointment reaches the limit, students will no longer be able to enroll into that particular appointment.
- Type the advisor "hosting" the group appointment into the Service Resource field and select their name.
- Click Save.
- Click Finish. Students assigned to the host advisor may now enroll into this group appointment through MyMadison Connect (see below for details, as well as instructions on how to share a URL for students not assigned to the host advisor).
Group Appointment Details
- In the Navigation Dropdown menu, select Appointments.

- In the dropdown menu within Appointments, select All Appointments.
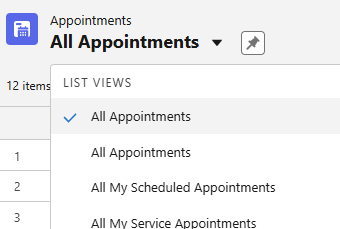
- You will see a list of all appointments that have been created in the CRM. Note: there are two options for All Appointments. If you are unable to find your group appointment, then you may need to select the other All Appointments option. Find your group appointment (if recently created, it should be near the top of the list). Click the appointment number SA-#### associated with your appointment.

- The Appointment details will appear.
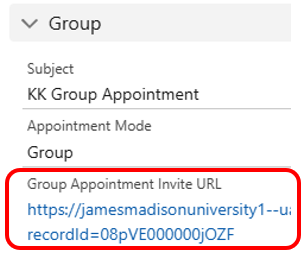
- In the Details tab, you will find the Group Appointment Invite URL in the Group section.
- This URL is usable for any student at JMU, regardless of whether they are an advisee of the appointment host.
- In the Details tab, you will find the Group Appointment Invite URL in the Group section.
-
-
- You may edit any field with a pencil icon. Once you finish making edits, click Save.
- You may Upload Notes & Attachments in the same way as individual appointments (see the Appointments page for more details). Be sure to share them with students once uploaded if you want students to see them.
-
Enrolling a Student
- In the Related tab, you may manually enroll any student by clicking New in the Service Appointment Attendees field.

- Search and select the name of the student in the Attendee field.

- Click Save.
Closing a Group Appointment
- To close a group appointment after it has concluded, go to the Details tab and change the Status from Scheduled to Completed. Populate the Post Appoinment Summary Topics with the appropriate topics for the group appointment.
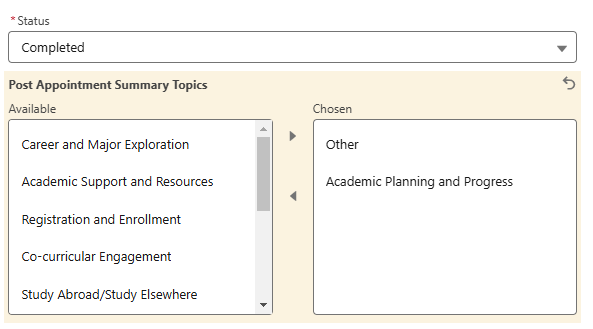
- Type any notes for the group appointment in the Advisor Notes field. Check Visible to Student if you want students to see the Advisor Notes. If you choose to select Visible to Student, then any Advisor Note typed here will be seen by all attendees.

- Click Save.
- To take attendance once an appointment is closed, click the Attendees tab. Click the checkbox next to the student name(s) that attended the group advising session and click the Mark as Attended button.
- Note: to select all students at once, you may click the checkbox next to the word "Name" at the top of the list.

- Note: to select all students at once, you may click the checkbox next to the word "Name" at the top of the list.
Student Experience
Students will enroll and view group appointments through MyMadison Connect. A MyMadison Student Tutorial is coming soon.

