
Setting up Personal Zoom Link
If you want students to be able to attend appointments virtually, then you will need to get a Zoom link and enter it into the CRM. Note: you will need to leave the CRM system to get your personal Zoom link.
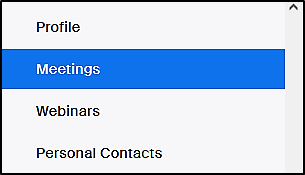
- Log in to jmu-edu.zoom.us and select Meetings.
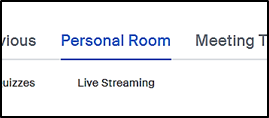
- Click on Personal Room tab.
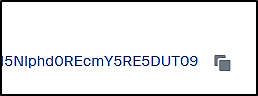
- Under Invite Link, click to copy the personal link to use in the CRM when setting up your service resources.
Best practice is to have a waiting room turned on prior to using your personal zoom URL so that if you have back-to-back appointments one student does not enter other students meeting.
Service Resources
After getting your Zoom link you will return to the CRM. In the CRM the Service Resource section of your account is used for scheduling appointments. This is where you will enter your physical office location for in-person meetings and your Zoom link for virtual meetings.
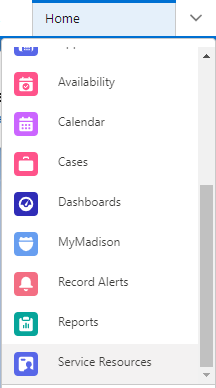
- In the navigation drop down select Service Resources. Your list may be defaulted to Recently Viewed it may be helpful to select All Service Resources.
- Locate your name in the List View by searching for your name. Once located, select your record.
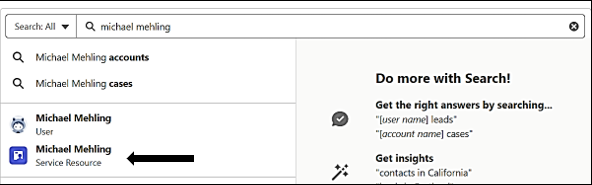
Note: You can also search your name in the Global Search bar and select yourself as a Service Resource.
Enter Zoom Personal Link
Under the Details tab, enter your personal Zoom URL in the Meeting URL field by clicking the pencil icon and click Save. This is the URL your students will receive in an email when they schedule a virtual meeting. If you need assistance getting your personal zoom URL, please see the section entitled Setting up Personal Zoom Link.

Enter a Physical Meeting Location
You will also need to set up your physical location for in-person appointments.
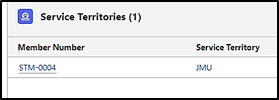
- To select your location for in-person appointments, select Related Tab.

- Under Service Territories, you should see JMU listed. To set up your physical location for in-person appointments, select your Member Number. Do not select the Service Territory (JMU), select the Member Number (STM-).
- Scroll down to location and click the edit icon.
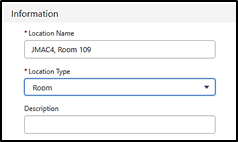
- Click New Location and enter your location for in-person appointments (Building, Room Number) for Location Name.

- Select Room for Location Type. Description is not required but can be entered if additional instructions are needed to locate your office.
- Click Save again. That location will be added to any in-person appointments that are scheduled with you.
