
IMPORTANT SAFETY INSTRUCTIONS
Always follow basic safety precautions when using your telephone equipment to reduce the risk of fire, electrical shock, and injury.
- Read and understand all instructions in the Owner’s Instruction Manual.
- Read all warnings and follow all instructions marked on the product.
- Unplug this product from the wall outlet before cleaning. Use a damp cloth for cleaning. Do not use liquid or aerosol cleaners.
- Do not use the telephone near water. For example, do not use near a bathtub, wash bowl, kitchen sink, laundry tub, swimming pool, or in a wet basement.
- Do not place this product on an unstable cart or stand. The product may fall
causing serious damage to the product. - Use only the type power source indicated on the label. If you are not sure of the type power supply to your home, consult your dealer or local power company.
- Do not place any objects on the telephone line cord. Do not locate the telephone where the line cord will be walked on.
- Do not block or cover ventilation slots and openings in the bottom of the telephone. The openings should never be blocked by placing the telephone on a bed, sofa, rug, or other similar surfaces. The telephone should never be placed near or over a radiator or heat register. The telephone should never be placed in a built-in installation unless proper ventilation is provided.
- Never spill liquid on the telephone or push objects of any kind through ventilation slots. Liquid or objects may touch dangerous voltage points or short out parts that could result in a risk of fire or electrical shock.
- Do not disassemble this product. Opening or removing covers may expose you to dangerous voltages or other risks. Incorrect reassembly can cause electrical shock when the product is subsequently used.
- Do not overload outlets and extension cords. Some telephones require AC power from an outlet. Overloading the outlets can result in the risk of fire or electric shock.
- Avoid using a telephone during a local thunderstorm. There may be a remote risk of electrical shock from lightning. Fuse (F1) is rated at 0.75A/250V Time Delay.
- Do not use a telephone to report a gas leak in the vicinity of the leak.
- Unplug the telephone from the wall outlet and refer servicing to qualified service personnel under the following conditions:
- When the line cord is frayed or plugs damaged.
- If liquid has been spilled into the telephone.
- If the telephone has been exposed to rain or water.
- If the telephone does not operate properly by following the operating instructions. (Adjust only those controls covered by the operating instructions. Improper adjustment of other controls may result in damage and will often require extensive work by a qualified technician to restore the product to normal operation.)
- If the telephone has been dropped or the housing damaged.
- If the telephone exhibits distinct change in performance.
CAUTION-Always disconnect all telephone lines from the wall outlet before servicing or disassembling this equipment.
SAVE THESE INSTRUCTIONS
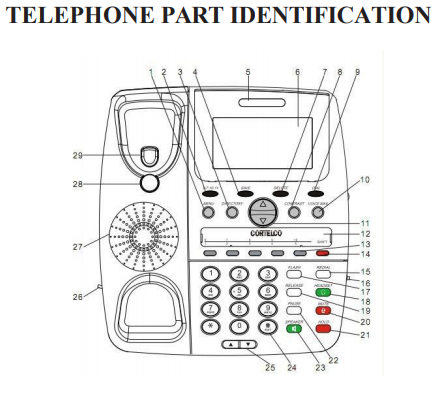
| 1 Menu Button | 16 HeadsetJacks |
| 2 Not Used | 17 Flash Button |
| 3 Directory Button | 18 Headset Button with LED |
| 4 Save Button | 19 Release Button |
| 5 Ringing Indicator | 20 Mute Button with LED |
| 6 Multi-AngleLCD | 21 Hold Button with LED |
| 7 Delete Button | 22 Pause Button |
| 8 Contrast Button | 23 Speaker Button withLED |
| 9 DialButton | 24 Edit (backspace) Button |
| 10 Voice MailButton | 25 Volume Up/Down Button |
| 11 ReviewUp/Down Button | 26 Handset Jack |
| 12 Directory/LogoStrip | 27 Speaker |
| 13 5Auto Memory Buttons | 28 Handset Hook |
| 14 Shift Button | 29 Hookswitch |
| 15 RedialButton |
Message Waiting Switch Location
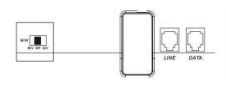
NOT USED- Set By Telecom
DO NOT CHANGE
TELEPHONE FEATURES
RECEIVING A PHONECALL
- When the phone rings, lift the handset or press SPEAKER to begin your conversation.
PLACING A PHONECALL
- Lift the handset or press the SPEAKER button and wait for a dial tone.
- For off campus calls, dial (9) and the telephone number you wish to call.
- For on campus calls, dial the 5-digit extension number.
Note
- If you wish to switch from speakerphone to handset, simply lift the handset.
- If you wish to switch from handset to speakerphone, press and release SPEAKER and then hang up the handset.
MUTE BUTTON
Press MUTE to speak without the person on the phone hearing your conversation. The MUTE Indicator will light up and remain lit until you resume your conversation. Also, “MIC MUTED” will show in the display. To resume the conversation, press MUTE. The MUTE indicator will go out and your call can continue.
AUTOMATIC MEMORY
Storing A Number
- Press SAVE, [SAVE TO?] appears on the display window.
- Press the desired memory location. (M1-M5 or SHIFT M1-M5)
- [ENTER NUMBER>] appears on the display.
- Enter the desired number using the keypad (maximum of 24 digits). Don’t forget to dial (9) for off campus calls. Press SAVE to confirm.
- [ENTER NAME>] will appear. Type the name (16 characters max.) using the keypad. Use REVIEW UP to add a space. Use REVIEW DOWN to delete a character. Press SAVE again.
- [SET VIP RING] will appear. Use REVIEW UP and REVIEW DOWN to select the desired ring cadence. Press SAVE again.
- [MEMORY STORING] will show briefly.
Dialing A Number
- Press the desired memory location (M1-M5 or SHIFT M1-M5)
- The number will be displayed.
- To dial the number, lift the handset, press SPEAKER or press DIAL.
VOLUME BUTTON
A built-in amplifier feature allows you to change the listening volume in the receiver of the handset when speaking with your party. Press VOLUME UP or VOLUME DOWN to achieve different levels. The volume remains the same between calls. It does not return to a nominal level.
REDIAL BUTTON
- To redial one of the last 10 numbers dialed, press REDIAL. The display will show the last number dialed. To scroll through the last 10 numbers, press REVIEW UP or REVIEW DOWN. Note that if HIDE REDIAL NUM was selected during setup only the first 8 digits of the number will be displayed. The entire number will be dialed out when REDIAL is pressed.
- After the desired number is selected, dial the number by pressing REDIAL again, lifting the handset, pressing SPEAKER or pressing DIAL.
- The selected number (32 digits maximum) will be redialed.
PAUSE BUTTON
PAUSE allows you to insert a 3.6-second pause when programming memory/speed-dial buttons.
- Press PAUSE and release at any point in the dialing sequence where a pause is desired.
- PAUSE can be pressed more than once to create a longer pause.
HOLD BUTTON
- Press HOLD, caller is placed on HOLD. To resume the call, press HOLD again
FLASH BUTTON
The FLASH button is used to transfer a call. With the call in progress, press FLASH, dial desired number. Announce the call and hang up.
HEADSET BUTTON
This telephone will accept either a 2.5 mm cell phone-style headset or an RJ type headset. Use HEADSET to connect and disconnect from calls.
CONTRAST BUTTON
Contrast can be altered whether on hook or off hook by pressing CONTRAST. There are 3 contrast levels.
RELEASE BUTTON
To end a conversation, press RELEASE. Dial tone will return.
VOICEMAIL BUTTON
Press VOICEMAIL to dial the voicemail.
DIRECTORY BUTTON
DIRECTORY is used to store the name and number of up to 99 of your most frequently dialed contacts. The names are sorted alphabetically.
RINGER CADENCE
The 2730 has 10 different ringer cadences. This makes it easy to distinguish a particular ringing phone from a group of phones.
RINGER VOLUME
The ringer volume can be adjusted over 4 different levels plus OFF.
CALLER ID FEATURES
RECEIVING CALLS
- When the telephone is not in use and a new call is received, the display will show the NEW symbol, the phone number, the caller’s name, and the call time for about 1 minute. The REPEAT symbol will appear if the call has come in more than once.
- After about 1 minute with no activity, the display will default to the Stand-By screen until another call is received or a button is pressed.
REVIEWING CALLS
- When in Standby Mode, press REVIEW UP or REVIEW DOWN to see the stored calls. This unit stores up to 99 calls.
- The NEW symbol will be removed from each call after it is reviewed.
- For internal extension numbers, the reviewed number can be stored into any of the auto memory buttons:
- With the number displayed, press SAVE
- [SAVE TO ?] will appear. Press M1-M5 or SHIFT M1-M5. Press SAVE again.
- The caller’s name will appear. Press SAVE again.
- [SET VIP RING] will appear. Use REVIEW UPandREVIEW DOWN o select the desired ring cadence. Press SAVE again.
- When the last record is reached, the display will show [-END OF LIST-].
DELETING CALLS
Individual call
- Display the desired record by pressing REVIEW UP or REVIEW DOWN
- Press DELETE. The display will show [DELETE? 1:YES 2:NO].
- Press 1 to confirm the deletion.
All calls
- Display the desired record by pressing REVIEW UP or REVIEW DOWN
- Press and hold DELETE for more than 3 seconds. The display will show [DELETE ALL 1:YES 2:NO].
- Press 1 to confirm the deletion.
CALLBACK (Only works with JMU 5-Digit extensions)
When reviewing received calls, there are two ways to dial the telephone numbers shown on the display by pressing DIAL.
- If you have reviewed the calls with the telephone handset on hook, press DIAL. The HANDSET symbol in the display will come on, and the number you have selected will be dialed automatically via the speakerphone.
- If you have already picked up the handset or activated the speakerphone, you may select the number to be dialed by reviewing the stored calls. After locating the desired number, press DIAL. The displayed number will be dialed automatically.
5-7-10-11 BUTTON (Not Used)
MESSAGE ERROR
The display shows [-MESSAGE ERROR-]” if the telephone receives a call that has an error in the transmission or reception.
NO DATASENT
The display shows [-NO DATA SENT-] if there is no caller ID (CID) number sent from the telephone company.
PRIVATE CALLS
- If the caller has blocked his number from being sent, [PRIVATE NUMBER].
UNKNOWN CALLS
- When the telephone company is unable to provide the caller’s telephone number, [UNKNOWN NUMBER].
USING THE DIRECTORY
This unit can store the numbers of up to 99 contacts in the directory. Names are sorted alphabetically starting with the first character. (To sort the Directory by the last name, enter the last name first.)
STORING ENTRIES
Press SAVE to store a number in the Directory. After pressing SAVE, the display will show [Save To?]. Press DIRECTORY. [Enter Number>] will appear in the display. Enter the desired number using the keypad. (max 24 digits). Don’t forget to dial “9” for outside numbers. Press SAVE to confirm. [Enter Name] will appear. Type the name using the keypad if desired. Press SAVE again to confirm all settings. [Number Stored] will show briefly.
Note: For Example, if A is the desired letter, press the #2 button once and A will appear on the display. If B is the desired letter, press the #2 button twice and B will appear on the display. Pressing the #2 button three times will select the letter C. If an incorrect letter is accidentally selected, press the down review arrow and start over. All letters are upper case. To enter a space when storing a name or number, press the up review arrow. Use the “#” key to edit entries.
FINDING ITEMS
Press DIRECTORY to enter the Directory Review Mode. The first entry in the Directory is displayed. The Down and Up Review Arrows may be used to scroll through the directory. To leave the directory at any time, press DIRECTORY.
To search for a directory entry, press DIRECTORY. Then, using the keypad, type the desired name.
DIALING DIRECTORY NUMBERS
Find the number you want to dial in the Directory List. (Telephone can be on or off hook) When the number shows on the display, press DIAL to start dialing.
DELETING ITEMS
Deleting IndividualEntries
Enter the directory and select the individual entry. To delete an individual entry, press DELETE once and then press 1 to confirm or 2 to cancel. The display will be erased and the remaining items will be re-sorted.
Deleting All Entries
Enter the directory. To delete all entries, press and hold DELETE button. [DELETE ALL] will appear in the display, select (1) for YES or (2) for NO. [NO RECORDS] appears in the display confirming there are no directory entries in memory.
MAINTENANCE INFORMATION
Treat your telephone equipment with care for trouble-free performance. Avoid dropping the handset. Carefully place the handset on-hook after use.
Avoid putting near heating appliances and devices that generate electrical noise (for example, motors and florescent lamps).
Clean your telephone equipment with a damp cloth. Stains may be removed with a mild soap. Do not use liquid or aerosol detergents or cleaning agents.
Do not expose to direct sunlight or moisture.